


Building Your Online Presence
Crafting Digital Excellence
Transforming ideas into stunning websites that captivate and engage your audience.

Igniting Digital Growth
Empowering Your
Online Reach
Online Reach
Driving your brand forward with targeted strategies and impactful campaigns.

 OUR DIGITAL SERVICES
smart ideas for your
brands are here!
Who we are
About Us
At Sigmaflux, our vision is clear: to deliver unparalleled quality across every aspect of our work, education, ethics, products, and services. We innovate and create products that exceed industry standards, ensuring utmost quality. We're committed to bridging the gap between industry demands and academic curriculum, providing practical, industry-oriented training to equip students for success.


000+
Clients
Companies
Types of Companies we serve

Expert Team
professionals team
Karan Makharia
Founder & Marketing Head
Karan Kapoor
Founder & Operations head

Riya
Lead Web Developer
Vaibhav
Lead Graphic Designer


Why choose us?
Partner with Sigmaflux for Expertise, Innovation, and Exceptional Results.
We are experts in web development and digital marketing, with over 7 years of experience. We offer unparalleled experience and exceptional services.
Say hi! to your ultimate business partner.
- Customized Web Development Solutions
- Targeted Digital Marketing Strategies
- Comprehensive Training Programs

client
satisfied
Client
Retention
 our progress
Realize Your Business's True Capability with Sigmaflux's Tailored Solutions
At Sigmaflux, we help you unlock your full potential through tailored web development and digital marketing solutions, maximizing your brand success.
- Data-Driven Optimization Techniques
- Continuous Performance Monitoring and Analysis
- Adaptive Strategies for Sustainable Growth
client
satisfied
Client
Retention
Our Projects
market-Leading digital agency
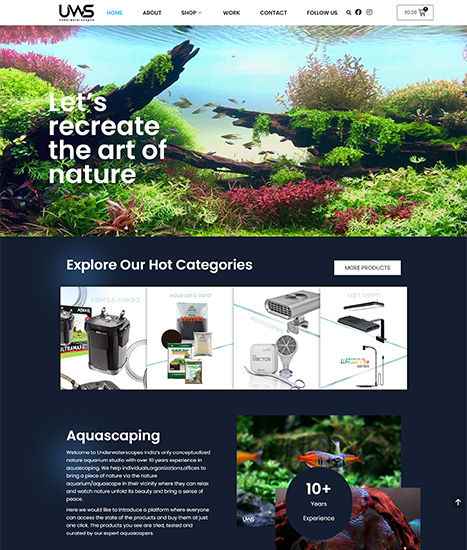
Porftolio + E-Commerce
Website Development
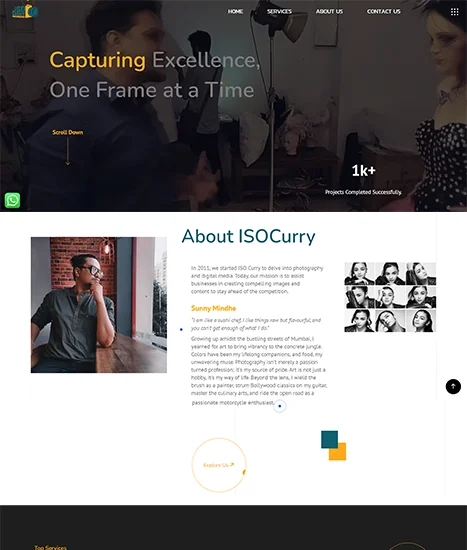
Portfolio Website
Website Development
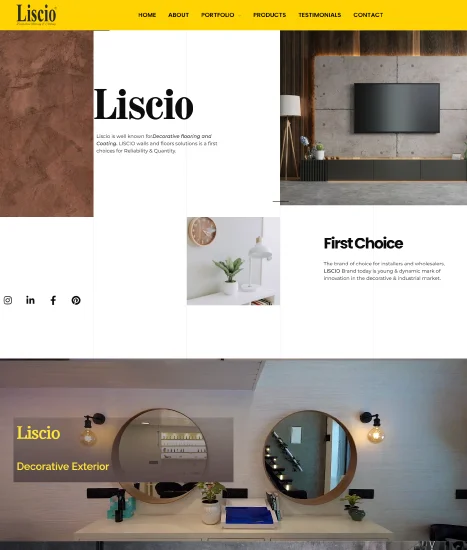
Interior Designer Website
Website Development

Industry Website
Website Development
testimonials
356+ customer
feedbacks


Sound technical knowledge and cost effective solutions are some of the reasons why you can use Sigmaflux’s services with confidence.
Liscio
We had a very complex problem to solve which Sigmaflux and team solved it very smoothly and efficiently. They understood our domain perfectly and have executed it to perfection. Smart people, Smart Team!
Tezzract
The website is of great help to us as admissions are there. We got more leads than we asked for via Website.
BVIMSR
You guys have done a great job. Bravo! Delivered the website in 2 days was a huge ask and you guys did it.
AMAP Aerospace
Sigmaflux was of great help to us, they were really professional and helpul with their services. Was always a call away for any help. Really impressed by the way our project was completed within timeline.
The Pacific Group
Sound technical knowledge and cost effective solutions are some of the reasons why you can use Sigmaflux’s services with confidence.

Liscio
We had a very complex problem to solve which Sigmaflux and team solved it very smoothly and efficiently. They understood our domain perfectly and have executed it to perfection. Smart people, Smart Team!
Tezzract
You guys have done a great job. Bravo! Delivered the website in 2 days was a huge ask and you guys did it.
AMAP Aerospace
The website is of great help to us as admissions are there. We got more leads than we asked for via Website.
BVIMSR
Sigmaflux was of great help to us, they were really professional and helpul with their services. Was always a call away for any help. Really impressed by the way our project was completed within timeline.
The Pacific Group


Resource Center
recent blog posts
Good content is always key, serving as the first step in effective marketing.

Why Facebook Ads Remain a Powerhouse in 2024
As we step into 2024, let's delve into why Facebook ads remain a potent force, driving tangible results for businesses

How to become a Social Media Influencer in 2024
Being an influencer is not just about having a large following but also about creating meaningful connections and impactful content.
Choose the Right Website Development Company for Your Business
Your website serves as the virtual storefront, and its development can either propel your business to new heights or hinder
How to Optimize Your Website for Voice Search
With the rise of virtual assistants like Siri, Alexa, and Google Assistant, optimizing your website for voice search has become

The Latest Trends in Website Development for 2024
n this dynamic era of technology, businesses and web developers alike are adapting to these trends to stay ahead of


Expect Great things From your SEO Agency
- application development
- BL consulting and implementation


with seo optimization
expect great things from your seo agency
We are 100+ professional software engineers with more than 10 years of experience in delivering superior products
learn more
our special price
We Combine Pricing Plans Your Business!
We are 100+ professional software engineers with more than 10 years of experience in delivering superior products Believe it because you've seen it. Here are real numbers


strategy & planning
save 29% on first year$14.99
monthly- application development
- consulting implementation
- Product Engineering
- Ico Management
strategy & planning
save 29% on first year$19.99
monthly- application development
- consulting implementation
- Product Engineering
- Ico Management
strategy & planning
save 29% on first year$39.99
monthly- application development
- consulting implementation
- Product Engineering
- Ico Management